Controlling appearance
View and Appearance Menu Options
For convenience, these options have been split into two menus: Apearance and View. Appearance options apply to changing the visibility, color, rendering style of the displayed structures, setting labels and ribbon displays. View options refer to more technical tasks, such as centering view on a particular atom, enabling manipulation of a part of the display, enabling smooth line mode, depth perception and view reset. Since all these options are related, they are given in a single table. Options that require more explanations are discussed below.
| Option | Explanation |
| Object motion: Move entire view & Move objects separately | These options allow the user to specify which part of the display should be operated independently from the the rest, and to reset back to common motion once the independent operation is finished. These options are also available through the toolbar shortcuts. Definition of the set to be moved separately is very similar to the selection mechanism used for appearance options and is explained below. The only additional option is choice of whether to enable dynamic tracking of steric clashes. |
| Protein Ribbon Display | This option brings up a dialog to set up protein ribbon display. Ribbons can be generated independently for amino acid residues, chains and selected combinations thereof, as well as have different styles and quality levels. |
| Protein Ribbon Color | Dialog is very similar to that used to color structure, except that it does not allow atom-level coloring. Ribbons can be colored at the level of individual residues. |
| Center View on Atom | The user can enter the atom name or left-click an atom in the Structure Viewer. Setting this will change the center of rotation from the center of mass of the displayed structure(s) to the specified atom. |
| Set Depth Perception | Adjusts the front and back fog planes (depth cueing). The perception of depth is created by shading farther objects more than those closer to the viewer. Front fog plane position determines where this shading starts, and the back plane determines the point, beyond which all objects are completely invisible. Ideally, the front fog plane should be immediately before the structure, and back plane - immediately after. In this case, the structure will have optimal depth perception effect. This especially applies to large structures, such as proteins. |
| Reset view | Resets the Structure Viewer to its default state, where structures are oriented according to their internal coordinates, center of rotation is at the center of mass of the entire display and view is adjusted to see all loaded structures. |
| Smooth bond lines | Enabling this option causes bond lines to appear more smooth. However, this requires more computational expense, and for large structures it will slow down structure rotation and translation. Therefore, it is recommended to use this option either for operating small structures or for image export. |
| Fit all to display | This option is similar to Reset view, except that no rotation is performed. The view is scaled up or down to fit everything in the window. |
Selecting parts of the display to which appearance changes apply
Sirius provides a standard selection interface in all three appearance dialogs: visibility, rendering and coloring. While the actions are different, the mechanism used to define parts of the display to which changes apply is the same.
Set of atoms to which the choice applies
can be defined in several ways:
- Currently selected: anything that is selected in the display area will
be used as the set to which apply the change. More options regarding selections
can be found here.
- Level of selection: an atom can be clicked in the display and depending
on the choice of level, the set will be defined as the entire structure
to which the atom belongs, its chain, its residue or just the atom itself.
- Selection of loaded structures: you may use the pulldown menu to specify
the structure that you would like to show or hide, as well as any named
sets that have been previously defined.
Structure Display options
Sirius provides complete control over visibility of any part of the display. Options include: display (show the chosen set of atoms), display only (show the chosen set and hide everything else) and hide (remove the chosen set from the display).

More options regarding selections can be found here.
Structure Rendering
There are several ways to represent structural information. The simplest and the most interactive form of representation is lines: bonds are displayed as thin lines and atoms are omitted. Selection/coloring of atoms is shown by selecting the corresponding segments of the adjacent bonds. This method of representation is the fastest, because almost any graphics hardware can quickly render lines. Note that default thickness of lines can be changed through the Preferences dialog.
Other rendering styles involve solid rendering and include stick representation, ball and stick, and space-filling mode.
Rendering quality control how smooth the rendered shapes appear. The Fast option increases performance by decreasing the complexity of the scene, while the Best option produces better quality at the expense of performance. It is recommended that fast rendering is used for routine work, while best mode is reserved for generating presentation and publication graphics.
Color
The specified set of atoms can be colored by element (default), or by a custom color. New color can be chosen either via the provided simple 16-color palette, by entering the three RGB (reg, green, blue) values in the text field, or by choosing the desired color from the interactive color chooser dialog. The dialog can be accessed by clicking the "Choose" button under the color palette.
Atom labels
This dialog allows for adding labels to atoms in the display. The Apply to panel is used to define which part of the structure/display should be labeled. In addition, the type of label information can be selected. In addition to the default types (atom name, element, charge, etc.), custom text can also be specified.
Once created, labels can be individually manipulated via Display Markers Manager. This component handles all labels, as well as distance, hydrogen bond markers, etc. It's accessible via Components -> Manage display markers menu.
Protein ribbon display
For structures of proteins, it is possible to display a ribbon cartoon that follows the backbone trace. The default view is a solid rendered ribbon of round cross-section colored by secondary structure element type. These colors can be changed in the Preferences dialog. The ribbon display dialog is used for initial creation of a ribbon, its modification (change of style or quality) and removal.
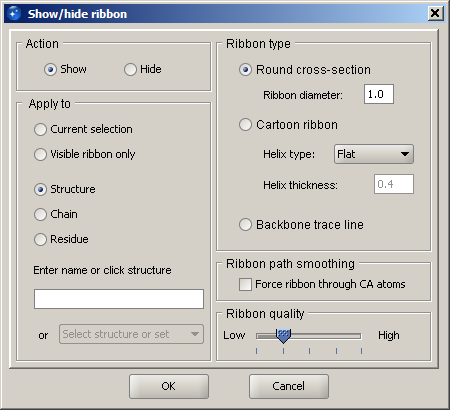 |
In the ribbon display dialog, specify the desired action: show or hide. The default style is solid rendered ribbon shape with round cross-section, while other options include a cartoon representation (wide helices and flat beta-strands with arrowheads), a similar style with cylindrical helices, as well as backbone trace that is a thin line following the path of the ribbon. Quality can be specified in a broad range: from quick display to publication quality rendering. It is recommended to use the lowest setting for routine work, since it considerably improves performance and makes selection and coloring events much faster (although the second level up is quite acceptable on average hardware as well). Once the scene is ready to be exported to an image or state file, you may change the quality to a higher level. Finally, the optimal setting also depends on the quality of the graphics hardware.
|
The last input is what part of the display the ribbon should be generated for. You may specify a structure or an individual ribbon within it. In addition, a ribbon may be shown or hidden for the current selection.
Finally, Visible ribbon only is a useful option for modifying style or quality of partially shown ribbon. If only a portion of the protein structure has a ribbon and it needs to be changed, use this option. If you select Structure, the ribbon for the entire protein/DNA will be displayed.
For round cross section and cartoon styles, you may specify radii of the ribbon elements. These include diameter of the cylinder for the corresponding helix style, as well as thickness of the flat helix.
Ribbon path smoothing is an option related to the way ribbon is computed. In order to produce visually appealing and still structurally correct results, ribbon path is smoothed, so that it passes at a distance from CA atoms. If close proximity to CA atoms is required, check the option Force ribbon through CA atoms. This may be needed, for example, when only individual residues are shown and they should be perceived as associated with the ribbon, instead of "hanging in space" away from the ribbon. This need frequently arises when importing RasMol scripts.
Finally, there can be only one style per chain, i.e. you may not have a cartoon ribbon for one set of residues and backbone trace for another within the same chain. While ribbon can be flexibly shown and hidden, the style and quality are constant throughout the chain.